Introduction
In this blog post, we'll go over how to set up a TimeMachine server with Docker. TimeMachine is a backup utility built into Mac computers that allows users to backup their full system to an external storage. We can quickly establish a TimeMachine server on any platform, including Windows and Linux, by utilising Docker.
This post will walk you through the process of creating a Docker container and configuring a TimeMachine server with Docker. You will have a fully functional TimeMachine server that you can use to backup your Mac machines by the end of this tutorial.
Setting up Docker on your machine
On Mac you can get the Docker Desktop app from the official website and install it by following the on-screen instructions. Once the installation is done, you can start using Docker by opening the app.
On Windows, go to the official website and download the Docker Desktop app for Windows. Then, run the installer. Follow the on-screen instructions to set up Docker on your computer. Once the installation is done, you can use Docker by opening the Docker Desktop app from the Start menu.
On Linux distributions have different ways of installing software. In general, you can use the package manager for your distribution to install Docker. On Ubuntu, you can install it with the command "sudo apt-get install docker." Once the installation is done, run the command "docker" in your terminal to start using Docker.
Container setup
Create a docker-compose.yml file anywhere, for example in /srv/timemachine.
version: '3.3'
services:
    timemachine:
        restart: unless-stopped
        container_name: timemachine
        network_mode: host
        environment:
            - ADVERTISED_HOSTNAME=
            - CUSTOM_SMB_CONF=false
            - CUSTOM_USER=false
            - DEBUG_LEVEL=1
            - 'MIMIC_MODEL=TimeCapsule8,119'
            - EXTERNAL_CONF=
            - HIDE_SHARES=no
            - TM_USERNAME=timemachine
            - TM_GROUPNAME=timemachine
            - TM_UID=1000
            - TM_GID=1000
            - PASSWORD=timemachine
            - SET_PERMISSIONS=false
            - SHARE_NAME=TimeMachine
            - SMB_INHERIT_PERMISSIONS=no
            - SMB_NFS_ACES=yes
            - SMB_METADATA=stream
            - SMB_PORT=445
            - 'SMB_VFS_OBJECTS=acl_xattr fruit streams_xattr'
            - VOLUME_SIZE_LIMIT=0
            - WORKGROUP=WORKGROUP
        volumes:
            - '/path/to/timemachine/backup:/opt/timemachine'
            - 'timemachine-var-lib-samba:/var/lib/samba'
            - 'timemachine-var-cache-samba:/var/cache/samba'
            - 'timemachine-run-samba:/run/samba'
        image: 'mbentley/timemachine:smb'
Make sure to update /path/to/timemachine/backup to the location where your TimeMachine backups will be kept. Change the default PASSWORD option as well; otherwise, someone on your network might be able to access your TimeMachine backup. Run the following command after creating the file:
docker compose up -dConnecting Mac to the TimeMachine server
To connect a Mac to a Time Machine server, you will need to first make sure that the Time Machine server is set up and properly configured. Once this is done, follow these steps on your Mac:
- Open System Preferences by clicking on the Apple icon in the top-left corner of your screen and selecting "System Preferences."
- Click on the "Time Machine" icon.
- Click on the "Select Backup Disk" button.
- Select the Time Machine server from the list of available disks.
- If prompted, enter the username and password for the Time Machine server.
- Click on the "Use for Backup" button to begin the backup process.
Your Mac will now back up to the Time Machine server automatically every hour, as long as the Mac and the server are on the same network and the Mac is connected to a power source.
Tips and troubleshooting
Static IP address
When hosting the TimeMachine server on a server, it's a good idea to give it a static IP address or hostname. Otherwise, when the server is rebooted, it might get a new IP address from DHCP and TimeMachine might not be able to find it automatically, in which case you'll need to connect to it again using the server's new IP.
Can't find TimeMachine server
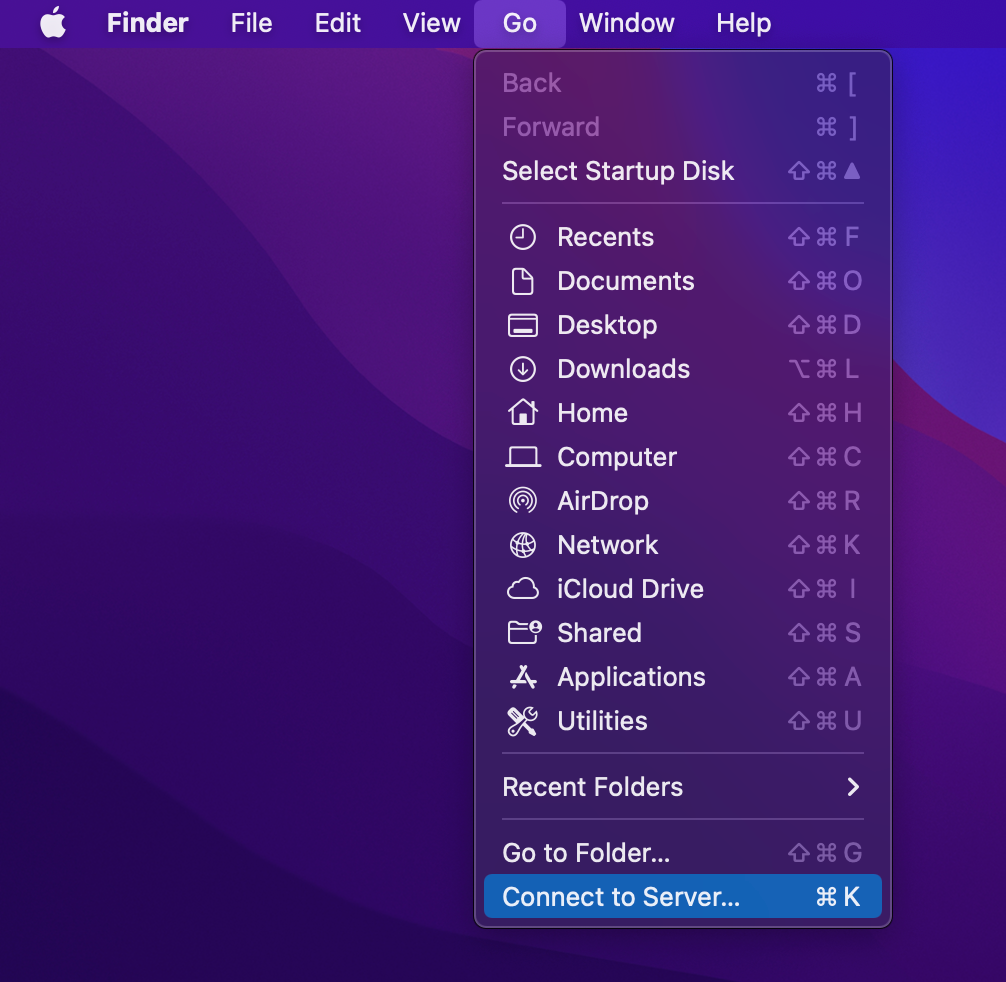
If you can't find your TimeMachine server on the list, open Finder, then from the context menu choose: Go -> Connect to Server...
Type in: smb://your-server-ip then click "Connect".
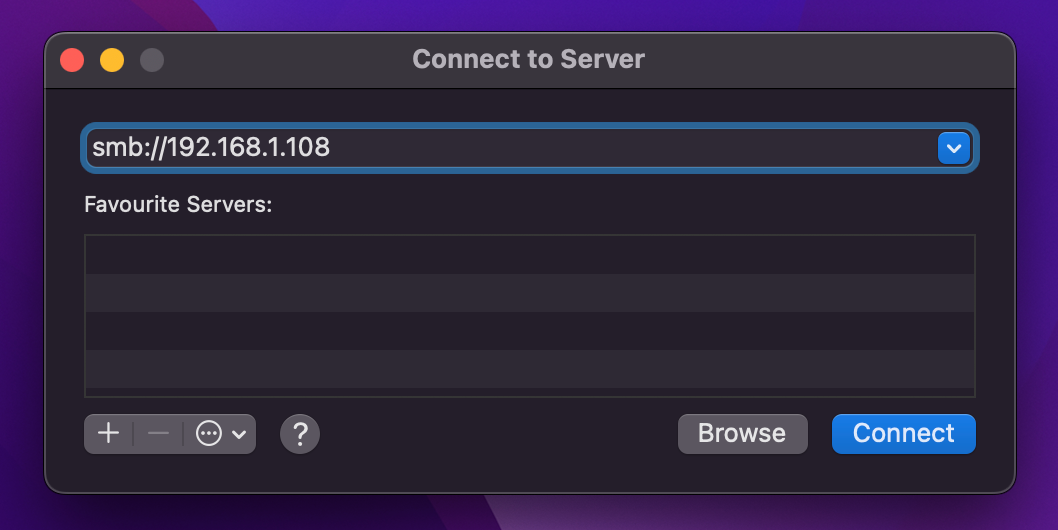
You will be asked for username and password to the TimeMachine server. Username: timemachine, password is what you defined in the environment PASSWORD variable.
Now, go back to TimeMachine preferences:

Now, select your TimeMachine server, and click Use Disk. That's it! Your server is now ready.
Conflicts with already running SMB server
If you're already running a Samba server on your machine, which was also the case for me, then the easiest option is to:
- Remove the
--net=hostoption fromdocker-compose.yml - Expose the ports manually, like this:
192.168.1.108:445:445, make sure to use your server's IP address instead of192.168.1.108. - Add another IP address to your host machine, you can do that even if you have one physical network card.
- Change
/etc/samba/smb.confand addinterfaces = 192.168.1.109
Sample config with manually exposed ports:
version: '3.3'
services:
    timemachine:
        restart: always
        container_name: timemachine
        hostname: timemachine
        ports:
            - '192.168.1.108:445:445'
        environment:
            - ADVERTISED_HOSTNAME=
            - CUSTOM_SMB_CONF=false
            - CUSTOM_USER=false
            - DEBUG_LEVEL=1
            - HIDE_SHARES=no
            - EXTERNAL_CONF=
            - 'MIMIC_MODEL=TimeCapsule8,119'
            - TM_USERNAME=timemachine
            - TM_GROUPNAME=timemachine
            - TM_UID=1000
            - TM_GID=1000
            - PASSWORD=“password”
            - SET_PERMISSIONS=false
            - SHARE_NAME=TimeMachine
            - SMB_INHERIT_PERMISSIONS=no
            - SMB_NFS_ACES=yes
            - SMB_METADATA=stream
            - SMB_PORT=445
            - 'SMB_VFS_OBJECTS=acl_xattr fruit streams_xattr'
            - VOLUME_SIZE_LIMIT=0
            - WORKGROUP=WORKGROUP
        volumes:
            - '/path/to/timemachine/backup:/opt/timemachine'
            - 'timemachine-var-lib-samba:/var/lib/samba'
            - 'timemachine-var-cache-samba:/var/cache/samba'
            - 'timemachine-run-samba:/run/samba'
        image: 'mbentley/timemachine:smb'
If you don't want to expose the ports manually one by one, you can also use macvlan as explained here:
 mbentley